on
Fablab and product developpement
Introduction
Many fablab are developping great project. But not a lot of them go beyond a well finished prototype. I’ve decided to write a guide with all the main ideas to bring your project further. This post will mainly focus on the mechanical production on a product and may be enriched later with electronics production.
In many fablab we are building awesome project fitting with our identity and values. We are designing toys, pedagogical tools, experimental projects and more. All of these project have a great potential since they were mostly created to anwser to a need or a problem we met. Keeping those project hidden is a waste. Even if they are documented. They may be pushed further.
Bringing a project to production can be time consumming. And since time is money… It will be expansive. The good news is, it doesn’t need to be difficult. I’ll try to write here the result of my researches.
The Fablab context
I’ve been working in a fablab for three years now. And I was also studying for an engineering degree. I’ve been involved in two very different world which used to met sometimes.
More and more industrial implements “Fablab” in their company. I prefer calling them intra-fablab since most of them doesn’t follow the fablab chart. But these labs give the opportunity to their employees to explore ideas and developped their creativity. And sometimes this play a major role in product developpment while reducing the cost and the mistakes.
On the other hand the fablab’s business model isn’t very powerful and usually rely on external source of funds. In the worlds fablabs rely on different others activity to keep them afloat. they may remains small and part of something bigger.
Products developpement may be a way of earning money for the lab. Some of them are used as a prototyping workshop for small company. Other provide engineering study services. In all of those case, this involve a lot of time and I may be really difficult to maintain a fablab and the professionnal services. Those practices leads to stress, supplementary hours, high load. In a fablab people are usually multidisciplinary with specialisation.
It is difficult to strucure a professionnal service while keeping the freedom of exploring others subject for the staff. So my goal is to propose a methods to developp products for the professionnal field while keeping the freedom and the ideology of fablabs
General approach
Creating a product isn’t a new process. All company are creating million of products and none have the same requirements. However the production scheme is globally similar. There is three well known steps :
- Project strategy
- Prototyping
- Low-volume production
- Serial production
1. Basic idea behind product developpement
MVP strategy
In our Fablab, we used a useful methods to enrich our product without losing its suitability. This is called the skateboard methods.
A well known notion in the start-up culture is the MVP (Minimum viable product) which is a more a mindset than a methods. This methods simply rely on a simple question :
Is all this I have planned really necessary to test my idea with a customer ?
Before building anything it may be a good practice to define the MVP of every feature of your product.
MVP strategy is usually called the skateboard methods which is a reference to the popular image below, made to explain the MVP strategy.
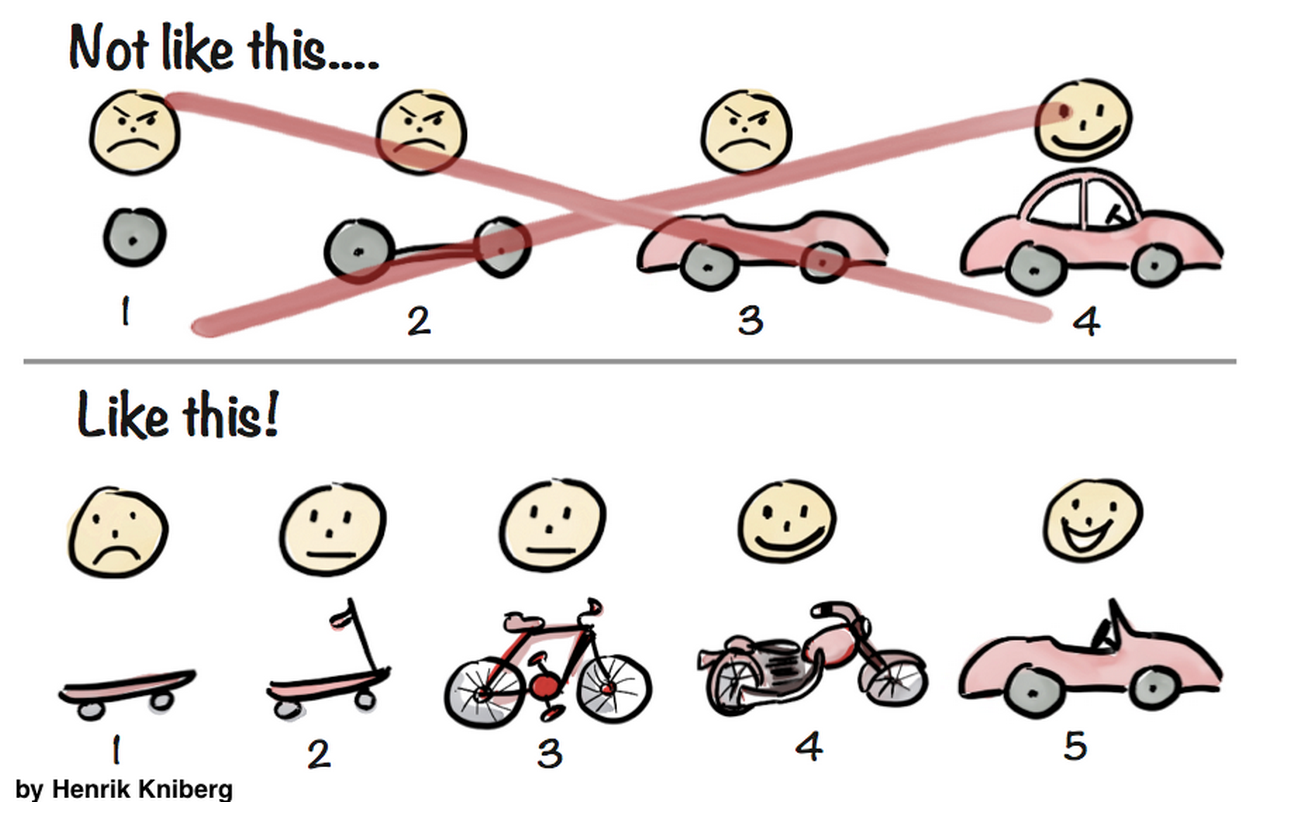
For each iteration of your product development. Add more feature accordings to the needs of your customers. You may collaborate with your customers to involve them into the developpment process. They will be statified to be part of the project and also less demanding about the final quality. Invite them to test the product often. But don’t forget your initial goals. You’re are still the only project manager.
This methods require time. And may be more expensive than a more straight forward strategy. But at the end you are sure that the final product fit the custommer request.
By providing a functionnal product to your customer, even if it isn’t finished. They will be able to accomodate with it. And they will probably talk about it at the same time. When you’ll become familiar with the MVP strategy you will naturally move to a more straight foward strategy to shrink your schedule. You’ll be confortable with your client and with your team capabilities.
Mind the cost and faisability
2. The prototyping process
Prototyping is all about crystalising your idea into something real. This phase may requires time and iterations. A prototype is an object in 4 dimensions. It has to evolve in time. Prototyping doesn’t mean you have to freeze your ideas. It is instead a thinking tool to push your products further. Exploring is always good, but don’t forget to think about your market and the needs behind your ideas.
Fablabs are the perfect place for prototyping. You have access to a workshop and propably to a lot of manufacturing solutions. These solutions are good for prototyping and low-volume production. But you’ll need to prepare the serial production using other process such as plastic injection, pcb manufacturer …
Don’t jump on 3D printers to test a solution. Fablabs offer plenty of methods to test solutions. Think about using cardboard, wax, origami. Don’t under estimate your laser cutter. It is good at making 3D part also ! Think about folding, bending, melting. In other words use your workshop at 100% of its capabilities. By exploring you’ll become more and more cost effective. By reducing the prototyping time and the material costs.
3. Low-volume production
Low volume production is more about the market and testing your production ideas than about the product itself. This phase made you to think about production in a concrete way. You want to satify a small range of customers who will be aware of potential problem with the product.
4. Serial production
This is your final goal. We talk about serial production from 1000 to a million copy of your product. This phase is the logic continuity of the previous one. You will have to fix all the previous production problem and adjust your features according to the cost and to the needs.
The costs
To succeed with a new electronic gadget, it’s absolutely essential that you know how much it will cost to accomplish your goal.
Cost #1. Electronics design
Designing the electronics. Estimated cost: $10,000-plus
The heart, or more appropriately the brains, for any hardware gadget is the electronics. From a design standpoint, the electronics will usually be the most expensive step. The majority of design engineers work on an hourly basis, so if things don’t go exactly as planned (trust me, they never do), your costs can get out of control quite quickly. One way to avoid run away engineering costs is to use a company like Predictable Designs, which provides fixed, published pricing for electronic design.
Cost #2. Prototyping
Prototyping the electronics. Estimated cost: $1,000-plus per iteration
Once the electronics have been designed, the next step is getting the electronics prototyped. This includes the production of the bare printed circuit board (PCB) that holds and connects all of the electronic components, as well as the assembly of all the components on the PCB.
Cost #3 – Software
Developing the software. Estimated cost: $5,000-plus
Nearly all hardware products include a microcontroller or microprocessor that requires some level of programming (called firmware). If your product communicates with a smartphone, then a mobile app may also be required. In most cases, you’ll need separate programmers for the firmware and the mobile app.
Cost #4 – The plastic enclosure
Designing the plastic enclosure. Estimated cost: $5,000-plus
You’ll need to hire either a 3D modeler or an industrial designer to develop the plastic enclosure for your product. I suggest starting with a 3D modeler initially because these professionals cost less, but later you may want to hire an industrial engineer to make your product look more aesthetically pleasing. If appearance isn’t critical for your product, then a 3D modeling expert will usually be sufficient
Cost #5 – Plastic enclosure prototype
Prototyping the plastic enclosure. Estimated cost: $500-plus per iteration
Once you have a completed 3D model for your enclosure, you’ll need to get 3D printed prototypes produced. Because of the popularity of 3D printing, this cost has come down in recent years. Be forewarned that in almost all cases, multiple prototype iterations will be needed to get your enclosure ready for market.
Related: 8 Reasons Why It’s Tough to Get Your Small-Brand Product Into Big-Box Stores
Cost #6 – The retail package
Designing the retail package. Estimated cost: $3,000-plus
Unless you plan to sell your product only online or on television, you’re going to need a retail package. The retail package can be as important as the product itself. It must not only protect the product during shipping, but more importantly it must sell your product.
Cost #7 – The retail package prototype
Prototyping the retail package. Estimated cost: $750-plus per iteration
Just as occurs with the electronics and the enclosure, you’ll need prototypes of the retail package. For a clamshell package, this will include the plastic shell and some artwork printed on an insert card. For a boxed product, it will include custom cut cardboard pieces plus the printed artwork.
Cost #8 – Certifications
Certifications. Estimated cost: $10,000-plus
Most products require certification(s), to be sold in various countries. This is especially true for electronic products, and even more so for wireless products. Certifications can be one of the biggest costs for new electronic products. Some of the various certifications required include:
FCC certification, for all electrical products sold in the United States, although this certification is significantly more expensive for wireless products UL certification or CSA certification, for any electrical product sold in the United States and/or Canada that plugs into an electrical outlet CE certification, for most products sold in the European Union. This certification is similar to the FCC and UL certifications required in the United States RoHS certification ensures that the product is free of lead and is required for products sold in the European Union or California.
Cost #9 – Manufacturing
Setting up manufacturing. Estimated cost: $40,000-plus
Setting up manufacturing will likely be your biggest expense. The electronics are relatively low in cost to set up for mass manufacturing, while the major portion of the cost is for the plastic enclosure.
Unlike plastic prototypes produced using 3D printing, mass-manufactured plastic parts use injection molding, which requires the use of expensive steel molds.
Cost #10 – Everything else
Everything else. Estimated cost: $1,000-plus per month
In addition to the major costs listed above, there are expenses such as product liability insurance, general business insurance, warehousing fees, shipping costs, etc. If your product uses Bluetooth, you’ll also have to pay a licensing fee to use their trademark.
Conclusion The cost to advance a new electronic product from concept to mass-manufactured product varies drastically. For highly complex products, the total cost to market may be millions of dollars, although most can be done for $100,000-plus. The first iPhone reportedly cost Apple about $150 million to develop and bring to market.
Sources
https://www.autodesk.com/redshift/manufacturing-costs-taking-your-idea-from-prototype-to-production/
https://www.protolabs.co.uk/resources/white-papers/prototype-to-production/
https://www.cairn.info/revue-journal-of-innovation-economics-2015-2-page-99.htm#
https://www.researchgate.net/publication/305092106_Developing_a_business_model_for_concurrent_enterprising_at_the_Fab_Lab
https://medium.com/@byrnereese/the-skateboard-mindset-in-product-development-ddf3409d5e98